|
Tutorial: Adding attributes (ie: size, color, etc)to
your online store shopping cart items.
If you sell items that require additional information from the user
to complete their order then this is the right tutorial for you. For
example, if you are selling a pair of shoes then you need to list
available sizes as well as the colors available for that item. Your
customers will then be able to select the exact shoe they would like
to order and your store will price the item correctly and add it to
the user's shopping cart.
Our system calls these item specifics (ie: color, size, ect.) the
item's ATTRIBUTES. This tutorial will go over a step-by-step example
of how to setup your item's attributes.
Step-by-step example of adding product attributes
Step 1. Ensure you have already added all the items to your online
store that you wish to add attributes to. In this tutorial we have a
flower painting that we want our user's to be able to select which
painting size they would like to purchase.
There are 3 parts to attributes: Option Name, Option Value, and Attributes on the product.
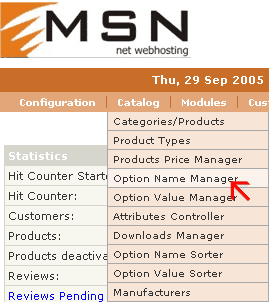
Step 2. Bring up the option name manager by selecting "Catalog" >
"Option Name Manager" from the drop-down menu.
|

Step 3. The product options page will now be displayed. Enter the desired name for your attribute in the Option Name box. The order box sets the display order of each attribute if an item has multiple attributes (lower sort order means attribute will be displayed first). You don't have to enter anything in the order box. The "Option Type" box allows you to set the way this attribute will be displayed to the user. We will us a dropdown box for our flower painting size attribute because the user must select only one painting size from a list.
Then click the insert button to add the attribute. You will notice when the page refreshes that the attribute is now added to the store.
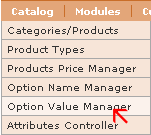 Step 4. Next choose "Catalog" > "Option Value Manager" from the
drop-down menu.

Step 5. You will now be at the Option Value Manger screen. Here we will add the options for our painting size attribute. So we will select our option name (Painting Size) and add the first item in the list (8x10) and click insert. You will do this repeatedly until you have entered all the possible values for your particular option name.
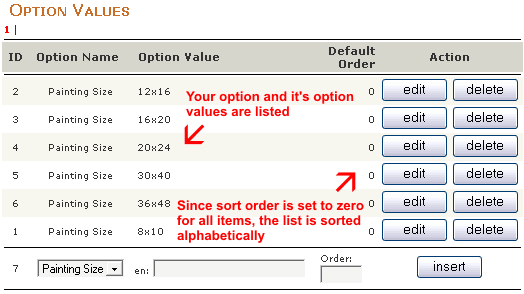
Once you have added all your option's values you will see them all listed here. You can use this screen to edit or delete options or add new options. The sort order option works the same way and you can order your items in the drop-down list by editing these values (otherwise the values will be listed in alphabetical order). Here is what that list looks like once it's sorted:
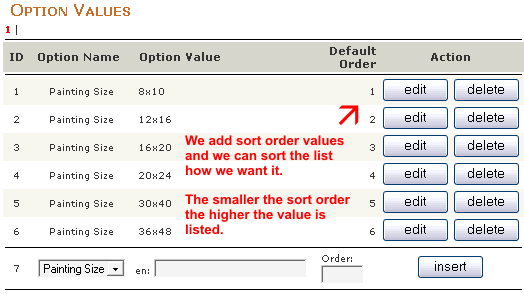
Step 6. Now we have our option (called Painting Size and created via the Option Name Manager) and we have assigned all the values it can have (via the Option Values Manager).
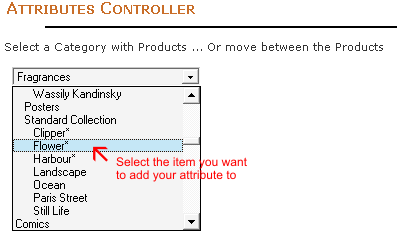
So now we must add this option to our particular products that will use this attribute. Go to the drop-down menu and select "Catalog" > "Attributes Controller" to assign the attribute to a particular product. Once you are on the Attributes Controller page select the particular item you would like to add the new attribute to.
This will bring up the Attributes page for that particular item. From here you will be able to add each attribute that matches for that particular item, as well as set the specific price and weight adjustments for that item.
Tip: Under the Option Name and Option Value manager you will be able to copy product attributes to other items.
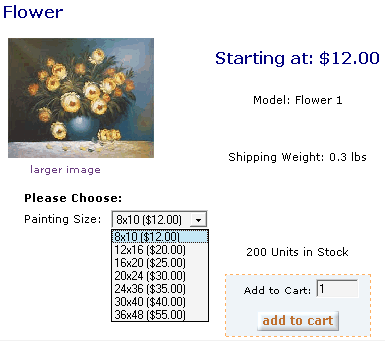
After you have added your attributes successfully you can view the item in your store to see the attributes ready for your customer to select and complete their purchase.
Click here for more information on product attributes directly from the Zen-Cart support website
Toll-free: 877-467-6932 • Online: Contact Us
Home | Webdesign & Hosting | Register Your Domain | Portfolio • Privacy Policy | User Agreement | Terms of Use | Copyright Information


